Cucumber is a BDD framework which adds another layer of abstraction (bad), but makes it easier to translate tickets to tests (good) and makes acceptance tests readable by non-technical people before the functionality is even written (good if used that way).
To switch to Cucumber, first make sure your tests run successfully in your current setup, so that if something goes wrong during or after the steps below, you know the blame is likely with the steps taken rather than with issues in your pre-existing setup.
If the tests still run successfully, let’s go ahead:
Install the Cucumber Node package
Run:
npm i @wdio/cucumber-framework --save-dev
Afterwards, if you look at your package.json, you will see it lists cucumber-framework alongside the other wdio packages, matching their
version.
Switch the framework configuration
To switch from the Mocha framework (which we had set up in Working with WebdriverIO | Writing the first test) to the Cucumber framework:
- Open up your
wdio.conf.js - Search for text fragment framework:
- Change
mochatocucumber
Set the Cucumber options
Add a new section to your wdio.conf.js as follows.
//
// Options to be passed to Cucumber.
cucumberOpts: {
  require: ['./test/steps/*.js'],
  backtrace: false,
  dryRun: false,
  failFast: false, // Fail on first step, useful for debugging
  format: ['pretty'],
  snippets: true, // Show pending step suggestions
  ignoreUndefinedDefinitions: true // Treat undefined definitions as warnings
},
It doesn’t really matter where you put it, but to be organised put it after mochaOpts.
Many of these options are, indeed, optional. I recommend adding them so they are made explicit. That way, when you ask yourself why something is happening the way it is, you don’t have to remember what Cucumber’s default options are, you can see them right in wdio.conf.js. I’ve not added all of them in this example, only the few I feel could be useful to know about.
Explanations and the fill list of options can be found at WebdriverIO’s Testrunner Configuration page.
Change the specs directory
You now have the step location in two places in your wdio.conf.js:
specs: [
  './test/specs/**/*.js'
],
and
cucumberOpts: {
  require: ['./test/steps/*.js'],
You can choose whatever location you like and match the folder and file structure to it.
We will add features to a new features folder, so let’s change the specs setting to:
specs: [
'./test/features/*.feature'
],
Now when you use the test runner it would look for features. We don’t have any yet though.
Change the folder structure
You can use Cucumber with or without using the page object model (POM). Using page objects has the advantage of being able to abstract away a page’s element selectors and custom functions into an intuitive structure, making it easier to stay up to date with a changing application. The downsides are that it’s yet another layer of abstraction, making debugging slower, and that dividing an application into pages is increasingly unrepresentative of modern applications.
We’ll include POM. Let’s address our folder structure:
- Go into the
testfolder. If you’ve followed along with the Basic setup article, it would only contain folderspecsat this point. - Rename
specstosteps. - Create new empty folders and name them:
features(this is where we will define our scenarios)pages(this is where we will define the page objects)support(this is where we could add helper functions generic to all pages)
Add a feature
Let’s add a scenario to drive the tests:
- In your IDE, navigate to the
featuresfolder - Create a new feature file. For this guide, we can just call it
tutorial.feature - Add the basic keywords and spacing of a feature file:
Feature:
  As
  I want to
  so

Background:
  Given

Scenario:
  When
  Then
Explanation
- Feature: what area of functionality are we covering and why do we need this functionality?
- Background: what conditions need to be in place before we can run our test?
- Scenario: what steps do we need to follow to verify the functional behaviour?
Writing the feature
There isn’t one right way, but here’s a suggestion. I will use a home automation web shop as example.
Feature:
  As a new user
  I want to find smart products that fit my living situation and needs
  so I can start the journey of making my home smarter

Background:
  Given I visit the 50five homepage

Scenario:
  When I search for the "Nest protect"
  Then I see search results
You can see I’ve put “Nest protect” in quotation marks. This way we can feed that string as a variable to our tests. If you then change the string in the feature file at a later time, you don’t have to update the test.
Note also that we don’t use a generic “When I search for a product” and define a batch of products in a hidden helper function. Cucumber and WebdriverIO are not meant to exhaustively test functionality, but rather to verify very specific example flows through the application as a layer of acceptance tests on top of our cheaper more exhaustive unit and integration tests, as well as to serve as a tool for communicating and documenting clear requirements.
In your IDE, you can install extensions for Cucumber and JavaScript to get nice syntax highlighting.
Rewrite the tests
If you have existing tests using the describe/it DSL, that needs to change now.
We’ll first do it without POM. Then we’ll create a page object and refactor.
Use or create test/steps/tutorial.js and add this to the top of the file:
import { Given, When, Then } from 'cucumber';

Given(/^I visit the 50five homepage$/, () => {

})

When(/^I search for the (.*)$/, (keyword) => {

})

Then(/^I see search results$/, () => {

})
If you have existing code, comment it all out for now so it won’t be run but you can use it to put inside the Given/When/Then statements later. In JavaScript, multiline commenting uses:
/*
The thing you want to comment out.
*/
Given/When/Then syntax
/^ and $/: These indicate the start and end of a regular expression (regex). The contents need to match the feature file exactly, except you can
use capturing groups to indicate variables.
(.*): This is a capturing group. In this case, I’m saying "capture anything that’s in this position of the sentence”.
() => {}: This is an arrow function. It just means "go and do the stuff in brackets". When I put keyword in the parentheses, that just means that
the capturing group I used in the regex will be available as a variable.
Babel
At this point, the suite still won’t run properly. This is because I’m using JavaScript ES6 syntax. This includes a bunch of cool new features which we’ll want to take advantage of. However, the browser can’t interpret it, so we’ll need to use a compiler. That’s where babel comes in.
To start using babel:
In your package.json, add the following to the devDependencies:
"@babel/cli": "^7.6.4",
"@babel/core": "^7.6.4",
"@babel/preset-env": "^7.6.3",
"@babel/register": "^7.6.2",
Now run npm i.
Once the packages are installed, add this to your wdio.conf.js in the cucumberOpts:
requireModule: [
  '@babel/register'
],
The cucumberOpts should now read:
//
// Options to be passed to Cucumber.
cucumberOpts: {
  require: ['./test/steps/*.js'],
  requireModule: [
    '@babel/register'
  ],
  backtrace: false,
  dryRun: false,
  failFast: false, // Fail on first step, useful for debugging
  format: ['pretty'],
  snippets: true, // Show pending step suggestions
  ignoreUndefinedDefinitions: true // Treat undefined definitions as warnings
},
Now we just need a babel configuration file and we can get trucking. In the root of your test suite, create a new file babel.config.js. Check
your node version via node -v and add this to babel.config.js (where 12 is replaced by whichever major Node version you’re using):
module.exports = {
  presets: [
    ['@babel/preset-env', {
      targets: {
        node: 12
      }
    }]
  ]
}
At this point, you can run the suite again!
npm t
This should return:
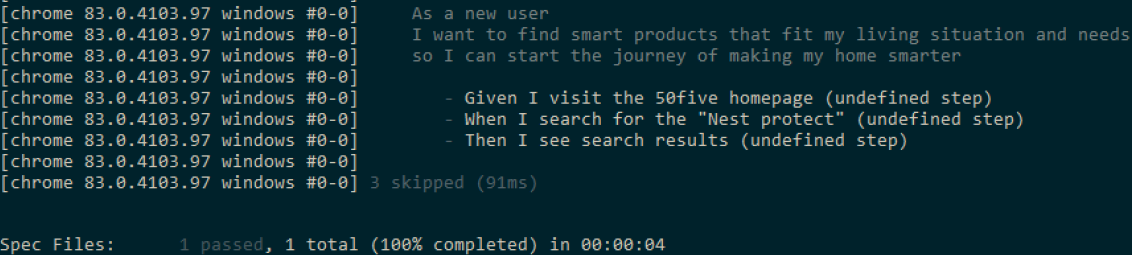
With the right formatter, this will have pretty colours.
Now let’s move our previous scenario into this new format. Example:
From
import { Given, When, Then } from 'cucumber';

Given(/^I visit the 50five homepage$/, () => {

})

When(/^I search for the (.*)$/, (keyword) => {

})

Then(/^I see search results$/, () => {

})

/*
describe('the 50five homepage', () => {
  it('should show search results when using site search', () => {
    browser.url('/')
    searchBar = $('input#search')
    searchBar.waitForDisplayed()
    searchBar.setValue('Nest protect')
    searchBar.keys("\uE007")
    expect($('.search.results')).toBeDisplayed()
  })
})
*/
To:
import { Given, When, Then } from 'cucumber';

Given(/^I visit the 50five homepage$/, () => {
  browser.url('/')
})

When(/^I search for the (.*)$/, (keyword) => {
  const searchBar = $('input#search')
  searchBar.waitForDisplayed()
  searchBar.setValue(keyword)
  searchBar.keys("\uE007")
})

Then(/^I see search results$/, () => {
  expect($('.search.results')).toBeDisplayed()
})
Now let’s run npm t again!
You should see:
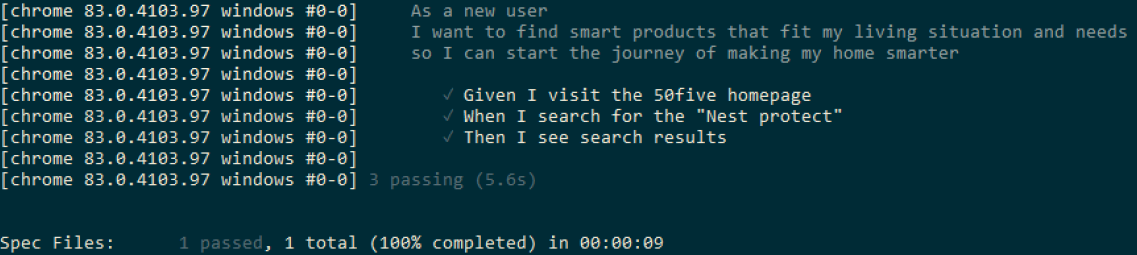
Presto!
The page object model
Now a little bit of refactoring to start using the page object model.
In your test/pages folder, create a new file called home.js. This page object can be used to define a generic page with selectors you want to
be able to use anywhere. You could do the same for functions, but we’ll leave that for the support folder helper functions and just have a
generic page visiting method here.
Start with this:
'use strict'

class HomePage {

/**
* Selectors
*/

/**
* Methods
*/
}

export default new HomePage()
When we define a page object this way, it means we can call it from other page objects to use anything defined in it (in this case we’d do so using
import HomePage from ‘../pages/home’).
When you expand the test suite and add specific page objects for discrete sections or pages (for example:
pages\search.js, you’ll need to refactor this a tiny bit to where you instantiate a class from those specific page objects and let those page objects import from the generic page object, instead of what we do now which is instantiate a class from the generic page object directly.
Now, let’s think about our sample scenario. It has 2 selectors, one for the search bar and one for the search results. These are not specific to a page, so we can define them in the main page object. Let’s do that:
'use strict'

class HomePage {

  /**
  * Selectors
  */

  get searchBar() { return $('input#search') }
  get searchResults() { return $('.search.results') }

  /**
  * Methods
  */

  open(path) {
    browser.url(path)
  }
}

export default new HomePage()
Now we can use those selectors anywhere we import this page object. So let’s import the page object.
Go into tutorial.js and underneath the Given/When/Then import add:
import HomePage from '../pages/home';
We can now use the search selectors we defined:
import { Given, When, Then } from 'cucumber'
import HomePage from '../pages/home'

Given(/^I visit the 50five homepage$/, () => {
  HomePage.open('/')
})

When(/^I search for the (.*)$/, (keyword) => {
  HomePage.searchBar.waitForDisplayed()
  HomePage.searchBar.setValue(keyword)
  HomePage.searchBar.keys("\uE007")
})

Then(/^I see search results$/, () => {
  expect(HomePage.searchResults).toBeDisplayed()
})
Run npm t and you should end up with the same test output as before.
Now we are in a land of beauty and sunshine.